Field Study and Service-Learning MediaBlog

30 April, 2007

San Ramón: Organic Herbs & Composting

La Fería: Doña Adita's Stand
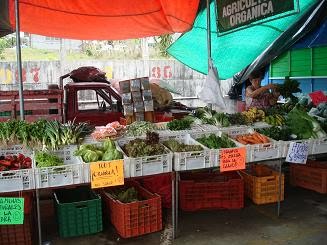
This picture was taken at the Farmers Market (Fería) in San Ramón. It is Doña Adita´s stand, which is the only organic booth at the Fería! Doña Adita collects various farmers´ organic products and sells them at her booth. Products that she sells consist of bananas, carrots, lettuce, cilantro, and many more. Devon and I went to the Fería to sell Patriana´s organic products. Strangely enough, we didn´t sell coffee. Instead, we sold rosemary and oregano, which Devon and I pruned; and organic compost that we made. Unfortunately, while we were there, none of our products sold. La Finca Patriana had us go to the Fería to figure out if it was worth their time and work in order to make profit. Now, at least they know not to waste their time selling their products at the Fería.


Making Organic Compost
This picture was taken at the finca inside the chicken shed. We composted organic materials here in order to make soil. In the back, Devon is turning the chicken manure with a shovel. This needs to be done when the compost has reached a temperature of 140 degrees celcius. Niki is in the middle sifting out the large materials in the compost. The large materials consist of mainly hay and straw. I am in the front mixing chicken and horse manure. Patricia is on the left, supervising us workers. Even though we were dealing with manure, we always had a good time!


Organic Composting Shed
Here is a picture of me learning about composting from Gary. This is a picture of inside the composting shed. We helped manage, shovel, and were involved in making the organic composted fertilizer in which they used on the coffee farm and sold it to the community as well. When Gary would receive his horse manure form the neighbor we would put it into the left side of the composting shed in a big pile. At first in needs to sit under a black tarp for a few days to ¨cook.¨ When the pile heats up to about 140 Celsius, we would shovel in to the other side to aerate it. The compost heat up so hot! This is because the matter and bacteria in the pile is breaking down. This process of aerating and cooking goes on for about one and a half weeks, and then can be moved onto a large tarp to add an extra nutrient, and dry for about 3 days. Now it is officially organic fertilizer rich in nutrients!! Working on the farm for Gary and Patricia was truly and amazing experience. They are very inspiring people who we learn so much from!


Author: Nicole Lynch


29 April, 2007

San José: Producol Recycled Plastic Company

 Rejected Products
When making the wood there are sometimes rejects such as these. The most common problems are the temperature not being quite right. Only about 10% turn out unusable like these ones, but, never fear because they can actually be reused (again). With the average monthly input of plastic around 16 metric tons, the eventual products weigh out to around 13 tons. All the work done by Producol is through contract bids, which allows the company to make product based on orders as opposed to having a lot of plastic wood stored for an indefinite amount of time on site. This also helps keep costs down as they can schedule the number of workers needed accordingly. The rejected pieces are stored on site until they can be sent back to be re-processed by a 'molina'.


  Miguel´s Wood Plank
This is Miguel holding up a piece of prepared plastic wood, and no, he is not about to hit any of his students (yet)! If you look closely you can see the pre-made holes. However, they are not just single holes drilled into the plastic! To avoid splitting the wood when attaching with screws, it is imperative to make an indentation with a special drill. You can see this a little better close up. When they sell the product it already has the special holes drilled into the wood. If a piece breaks, Producol actually takes it back. They then cut off & dispose of the ends of the plank with the screws & either re-use the smaller piece for another product (such as a trash can), or send it back to the 'molina' for re-use.


Chop that wood?
In this photo the workers are cutting off the extra plastic while the post is still hot in the mold. The process: Use gallon buckets to feed plastic in the machine, add the chemicals to mix the plastics together and heat, then the machine pushes the plastic into the mold. The workers know when the mold is full because plastic begins to melt out the opposite end of the mold. The excess is cut off from both ends, and then the mold is put into the water to cool, the product then shrinks a little and can be removed from the mold. Once removed from the mold the product must cool more, I could feel the heat on my foot radiating off as I took this picture!


Yikes, left over!
This is Nicole, and she is holding up a couple pieces of extra plastic wood! There will always be some extra plastic after production either from production itself (trimming the molded pieces or trimming pieces down to size), or rejected or broken pieces. Producol even will repair broken pieces that have left the building! All that plastic piled up must be good for something, so Don Jamie works with the 'molinas' and is actually able to send all this extra plastic back to be re-chopped and shipped back in his special mixtures, and as it turns out the mixtures of plastic with the plastic wood in them tend to make a better product.


Producol Office: Plastic Wood in Action!
This is the office of the owner of Producol Maderas Plasticas. His name is Don Jamie. He started this business five years ago when he couldn’t get a permit for construction. He got the idea of plastic wood from someone in his family back in Columbia. Currently there are only four countries that make plastic wood, and there are two others here in Costa Rica. Don Jamie works with another company here so that they do not compete in the same market, the other company only makes shingles and the two work together to make a couple of other things, including wheelbarrows. Producol mostly makes shipping crates, fence posts and two by four lumbers, but they also make garbage cans, benches, picnic tables, feeders for animals, and swing-sets! The product costs a little more than regular wood, but the company guarantees the crates to last 5 years where wood only lasts 1.5 years. The plastic wood is much stronger than regular wood and a structure holds all the fabricated wood until it is shipped out. To make the wood stronger they use more plastic number 5, and to make it look nicer polyethylene.


All that Plastic
Maderas Plasticas receives about 25 metric tons of plastic each month in hopes of using 16-17 tons and produces about 13 tons of plastic wood products each month. The company works with other facilities that clean & prepare the plastic ahead of time ('molinas'). The process is basically sorting the different types of plastic and cutting the pieces down so they are very small. You can see how small each piece is as it falls like confetti before Chris! Because of strong working relationships between the molinas and Producol, Producol is able to request mixtures of the plastic types that are most beneficial for making plastic wood. You can see the special mixture as a worker scoops it out by the gallon bucketful and our group is gathered around the large bag. About four buckets are used for fence posts and 1.5 buckets are used to make wood planks. Normally it is not possible to use a mixture of plastics together, but Producol adds a chemical for better mixing.

Author: Danielle Sunde


28 April, 2007

Heredia: Ecopaper at Artesanias Finas del Pueblo

The Start of the Making Paper: Old Paper
The company buys pre-consumer and some post-consumer waste white paper (seen here in the brown paper wrapped package). This paper is roughly chopped up and placed in buckets of water with bacteria to prevent molding (bottom right). The paper soaks in the water for 3 weeks after which the paper bits are put in a blender and ground up into a pulp (the long soaking makes this process easier). The plant fibers are then added the pulp is moved to the forming basins. The whole soaking and grinding process depletes the fibers that made the original paper sturdy which is why more fibers, in this case from natural sources, must be added after blending by which time most of the fiber destruction has occured. The more water goes into this mixture, the thinner the paper will be.


Pressing Paper by Hand & Mechanically
After the paper drip dries next to the basin, it is flipped off its screen onto an absorbant fabric (in this case a thin synthetic wool). Water is manually squeezed out with a cup made from bamboo (shown top left). The screen is then removed and another sheet of fabric placed ontop of the paper. This process is repeated until a large stack is formed. The stack is then un-stacked and reformed making sure every sheet of paper is completely flat and adding a sheet of metal under each piece of paper. The new stack is then placed in a press where more water is mechanically squeezed out (shown bottom right).


Warehouses & Sample Paper
Molinos Tierra Verde or Artesanías Finas del Pueblo specializes in recycled paper products made with natural, Costa Rican fibers. The six most used fibers are grass, corn, pineapple, banana, fern, and coffee. Other fibers, mostly agricultural by-products, are collected from local farmers markets and farms and include cabuya, melon, and pine-needles. Most paper produced is anywhere from 10 to 80% fiber with high fiber counts resulting in grainier and more rustic-looking papers that can be used for covers. The plant also produces some 100% fiber paper to be used for decorative binding covers. Also, if fiber is cooked before being added to the paper pulp, a much thinner and smoother paper can be produced. A sample of several different fiber counts and fiber types is shown above (center, bottom). After the paper is produced, the paper products are made at the plant in the on-site warehouse and cutting shed (shown above, left). Here large sheets of paper are cut to size, bound, and printed. Once production is complete, finished and packaged goods are kept in an off-site warehouse where visiting students and store-owners can purchase goods (shown above, right).


Drying Paper
After mechanical squeezing, the paper is unstacked and each sheet of paper, on its sheet of metal, is placed on a shelf inside a drying oven (shown above). At this plant, the oven is heated using scrap wood from around the farm and from other local farms. Due to inefficiencies in design, the oven here only reaches a temperature of about 45°C at which temperature the paper must be dried for about 3 hours. Also, the paper must be rotated through the oven during these three hours since some parts of the oven dry faster than others. In a more efficient oven, temperatures of about 80°C would dry the paper in about 10 minutes. After drying, paper is sorted by quality and weight: high, medium, and low, and very thin, semi-thin, and thick. Very thin paper is compressed and flattened one final time in a paper press for a few hours before being cut, decorated, and bound, and otherwise finished for sale.


Newly Made Paper
Once the paper pulp and fiber mix is moved in the forming basins. Basins can be any size or shape but for a comercial plant should be large with straight sides and a large enough mouth to easily fit a screen of the desired size. The screen is used to pull an even layer of pulp and fiber out of the water-pulp-fiber mixture in the basin. The screen is pushed into the mixture in the basin and then lifted out, always keeping it as horizontal as possible, and then set on a rack to the side of basin to drip dry (shown here) while the next screen is lowered into the mixture. The screen used here is made from mosquito netting and nylon ornamental sunscreen stretched over a metal frame.


María Giovanna Huarado
María Giovanna Huarado (shown here, center, talking to two EEI students) started working with Molinos Tierra Verde four years ago as an administrator of sorts. She manages paper marketing and output as well as helping with development of new products. Currently the market for natural paper is down due to the high number of producers for a limited and almost completely international (as opposed to local) market. María is working to increase quality to minimize profit losses as well as seeking out venders so they can sell paper more directly. The company also makes products to special order and is working on a line of greeting cards with their recycled paper, but lined with re-used paper for easier writing, to sell in the Costa Rican market. María hopes that Ticos will buy their new products despite the lack of flashy Western modernity before other companies start copying their idea. This lack of time is an issue for all of the companies products as paper “factories” cannot copyright their ideas either in method of paper production or in design of products (binding of notebooks, style of photo album, or greeting cards lined with re-used paper).

Author: Sami Nichols

16 April, 2007

La Tigra: Bosque de los Ninos (Children's Rain Forest)

BEN: Education Center
This is a picture outside of the 'Aula' (classroom). We went to this classroom when we first arrived at Bosque de los Niños. Here, we met with Tory who is the responsible for communication with various groups. Tory gave a power point presentation of Bosque de los Niños. Usually, this classroom is used for children to perform different educational activities. Also, volunteers and workers use this room as a kitchen and even a bathroom which are located inside. After Tory´s presentation, we went a hike in the forest. Later we returned here to eat our lunch. There are many other classrooms and biological field stations located at Bosque de los Niños.


Aula Classroom- Bosque de los Niños
This is a picture of the inside of the Aula classroom. Here, Tory gave a very ellaborate presentation of Bosque de los Niños. She began her lecture talking about the background of Bosque de los Niños (BEN) and it´s relationship with Monteverde Conservation League. After, she told us how the community is heavily involoved with BEN. Local farmers, children, and adults work with BEN in order to create a sustainable society. Also, Tory mentioned that BEN was also in collaboration with MINAE and other non-governmental organizations. BEN has benefits the environment involving reforestation and watershed projects.


Guides of Bosque de los Niños
The man on the left is our main trail guide. The women on the right is Tory who gave a us a presentation of Bosque de los Niños prior to our walk. Our trail guide was quite knowledgable in the forest. He knew of old traditions using the forest´s resources. For instance, he showed us leaves that were used as roofing on his house as a child. Also, he showed us leaves that were used for shining shoes and other plants that were taken as medicine. I thought that was cool because I realized how much things have changed in Costa Rica over 50 years. It´s nice that he can still tell stories of traditional Costa Rica.


Waterfall
As we were walking on the trail, we came across a beautiful waterfall. The water was very clear and uncontaminated. Tory told us that the water was clean enough to drink directly from the stream. Our professor, Dr. Miguel Karian, dipped his whole head in the water. Other students tested the water as well. I did not noticed any fish in the water. It was very slippery walking across the rocks, however, no one fell in the water. On our walk back, we saw another stream that was very similar to this one. To me, this was one of the most beautiful spots in Bosqe de los Niños.


Pilon and Miguelito
This is a picture of our professor Miguel hugging the Pilon tree. The Pilon tree is my favorite tree in Costa Rica. It is an enormous tree. The tree is a native species of Costa Rica. The Pilon´s scientific name is hieronyma alchorneoides. It is also a popular tree for deforesting because it has very strong and hard wood. Also, the wood is resistent to termites. I have seen this tree in many different locations of Costa Rica. However, it is mostly found in the Northern and Atlantic Zones. Pilones survive the best in humid tropical forests. Even though, I have seen this tree in many places, the number of trees has been reduced considerably. Save the Rain Forest to enjoy the beautiful and magnificent Pilon tree!!


Learning about Bosque de los Niños
During our hike in Bosque de los Niños, we discovered the different species in the forest. One tree produces flammable sap. This sap provides light when you get lost, and fire when you need to cook or get warm. The Palmeras tree is another species that is beautiful. Poachers chop the tree because everyone wants it in their house. Another favorite tree of mine is the monkey latter. It swirls up a tree and looks like a set of stairs for a monkey´s house. It is crazy to realize that this area was once exploited as a banana plantation and now it´s an enchanting forest.


 Author: Anne Christoff

15 April, 2007

Palmares: Madre Verde Community Conservation

Madre Verde & Earth Education International
This sign was made for us by Madre Verde. It reads ¨Education International Para La Tierra, ¨ which is Earth Education International in Spanish. It represents our group of nine people from all walks of life who share a common goal. We all came to Costa Rica to learn, and gain experience in helping to contribute to a sustainable and peaceful future through global and regional studies, cultural immersion, cooperative problem-solving, and self-exploration. The sign was planted with our nine trees. Between the sign, and our nine trees, the group of the first ever Earth Education International will be always represented and remembered.


Madre Verde, Planting Trees
The first ever Earth Education International contributes to reforestation. Each person in our group was given a tree from the foundation. The group was designated an area in the forest to dig our holes and plant our trees. The area will forever represent Earth Education International and our goal of learning about and helping our planet. Our small contribution to help this reforestation project is a big step in the right direction. The definition of reforestation is: the process of restoring and recreating areas of woodlands or forest that once existed but were deforested or otherwise removed or destroyed at some point in the past. This was the first time for many people in the group to plant a tree, how exciting! Ironically it rained the whole time we planted our trees and through out the day as well, which is the perfect time for planting! Our trees had an amazing view of Palmares and a small valley. The tree planting was apart of a ceremony for our group. Miguel read us an extremely heart filled and super inspiring poem along with the goals and mission of our group as a Whole. He gave us certificates signifying our achievements in the program, and Earth Education International hats! Thanks Miguel!


Madre Verde, Environmental Educational Center
This is the educational center in Madre Verde. All of the schools in the area come to Madre Verde to teach the children about various environmental education. It is an area where kids can come into nature to help them understand the importance nature, physically and visually. This educational center also offers classes and events such as dinners and tree planting days. The people of the foundation also have many hopes and plans for the future of the education center. While we were there, there was a kitchen and offices being build next to the center.


Madre Verde: Walk Through the Forest
The gentleman in this photo is Willam Garcia, the administrator of the foundation Madre Verde. He is from Palmares. The foundation is made up of the people in the community but there are five main people who are representatives for the foundation. Willam taught us about the history of the area and the foundation. He lead us on an educational walk through the forest. There were beautiful views of the valley, Palmares and San Ramon.


Madre Verde, View
Madre Verde is a foundation started by the people in the community of Palmares. The people of Palmares destroyed their forests for land in order to grow tobacco and coffee, to make money to send their children to school. Because of the lack of forest, the community eventually lost their water source due to poor watershed. This loss of water is what motivated and educated the community on the importance of their natural resources and forests. In turn, the foundation was created with the purpose to recover and conserve the forests and the watershed in the area. This is a photo of the forests in the reserve. Madre Verde has three concepts for their forests: natural regeneration, reforestation, and conservation.


Madre Verde, Green forest!
This is a photo of us on our walk. This is the point in the walk where we first entered the section of the forest that was being conserved. As soon as you walk in this section, there was an amazing change in climate. Everything was very green; the temperature of the air was cooler, and moister. We were hit with the unique lush smell of a forest! On the other side of this photo was the area of reforestation. Everything was much dryer. It is still in the process of recovering from deforestation. This valley is an are of watershed, making the presents of a forest very important to the community and its water source. This just represents the importance and a forest in an area. With trees, the water and nutrients area better held in the soil and in the area, hoping to recuperate the community’s water sources.


Author: Nicole Lynch

12 April, 2007

Sabana Grande, Nicaragua: Solar Photovoltaic Panel Construction

Photovoltaic Battery Chargers--Attaching Wires to the Panel
This is a photo on the left is of Chris in the middle stages of finishing a single panel. First he separated the black and red wire. He connected and soldered the conductive strip to the duplex wire, the red wire to the front of the panel, which is the positive side, and the black with to the back side of the panel which was the negative side. Here Chris is soldering each wire to the correct side. Again, he used the soldering iron and the tine wire as glue like substance. Next, we drilled holes into this metal. The metal parts are what hold the batteries. After the holes were drilled, the next step was to screw the metal onto a small wood piece making it a complete structure to hold the batteries. Next we connected the black and red wires to the battery holders, which fully connecting the panel to the battery! Each of us made our own individual panels and took it home with us to charge batteries and to educate others to spread to word about the power of solar power!


Photovoltaic Battery Chargers--Soldering the Cells Together
Nicki, Devon, Chris, and Danielle worked with Grupo Fenix to make photovoltaic solar panels. Grupo Fenix is a non-profit organization supporting renewable energy and sustainable development in Nicaragua, especially in low-income communities. These panels are small version of a solar panel, and are used for charging four double A or triple A batteries. Many houses in the community used big solar panels to provide energy to their houses. The first step in making the solar panel was to form a ¨chain¨ of four photovoltaic cells by soldering the conductive strip to the cell with tin. The tin wire was melted onto the tip of the soldering iron and used as glue like substance. The positive side of one cell must be joined to the negative side of the other cell, forming a connection is series. These cells are the main component of a solar panel, they are what gathers the energy from the sun, and directly converts it into energy. The cells are donated to Groupo Fenix and the community or sold at a very low price. We soldered four cells together with the soldering iron you see here in Devon’s hand. The iron was very hot, and was held like a pencil. It was fairly easy to use, yet it took a few tries to get the hang of it!


Photovoltaic Battery Chargers: Applying Adhesive
In this step we made the frame for our photovoltaic chargers. For this we needed a cut-to-fit rectangle of glass 4mm in diameter, 9cm in width and 18cm in length. Next we made the frame around the piece of glass. Each piece of the frame is 1cm wide and is made of Reten, which is the same metal commonly used for the roofs of Nicaraguan homes. We applied silicone on each side of the frame, using a glue gun of sorts and set the glass in place by building the frame around it. We let this dry for about ten minutes. Next, transparent silicone is mixed in a separate container until the consistency is much like cake batter. At this point we used a spoon to layer the sheet of glass with the silicone liquid, (as Mauro is demonstrating for us here) while avoiding touching the sides with precision. We allowed the liquid to settle out, so that it evenly covered the entire glass sheet and we were then ready for the next step.


Photovoltaic Battery Chargers:
Gluing Cells to the Panel
The substantial mixing of the silicon in the previous step is essential to avoid bubbling. If the silicone dries with many bubbles, it defects the solar cell capability because the bubbles block the sun. Once we made sure that we had minimized the bubbles, we were ready to place the chain of cells onto the glass. The negative side (dark blue) faces down in order to attract the suns rays and accordingly, the positive side faces up. The conductive strips (which extend from both ends of the chain) must lay on the outside of the frame, so they may be connected to the red and black duplex wire #20. In this photo, Danielle and Devon are gently pressing the chains down into the silicone because the cells are extremely delicate (as Chris learned the hard way). If one cell breaks, the whole process of soldering must start all over again. After the slight mishap Chris encountered, all the cells were successfully
ready to move onto the next step.


Photovoltaic Battery Chargers--Panel Testing
This is a photo of Danielle and Nicki with a solar panel in the making and a multimeter that measures the voltage and the amps of the panel. Each time we would make an addition to our panel we needed to go into the sun and check to see if our panel was still efficient. We checked the efficiency and voltage of the panel by connecting the meter and the panel. We proceeded to do this after each addition: after we soldered the four cells together, after we added the red and black wire for positive and negative connection onto the panel, after we mounted our panel into their metal frame with the silicone and covering it with a waterproof blue fabric, and after we added the actual battery holder to the other end of the wires. Everyone was successful with every check up with the mulitmeter! The amount of energy a solar panel can produce will strongly depend on the weather; the clouds, rain, and the actual amount of sun that day. This day was rainy and cloudy, yet our panels were still collecting and producing energy from the sun!


Photovoltaic Battery Chargers--The Final Product!
We have now completed the process of making the 1.5 volt photovoltaic solar battery chargers. This is thanks to the tremendous efforts of Groupo Fenix and two men in the village of Sabana Grande, Mauro and Mario. In this photo Devon, Niki, Chris and Danielle are proudly standing with Mauro and their completed products. Mauro and Mario are both certified electrical technicians employed by Groupo Fenix. They have both been trained how to build and install photovoltaic cells and solar panels. Through their work, they have improved their own lives as well as the standard of living for their community as a whole. Many tourists come annually to learn from these men and appreciate all their successes. Much of the community is off of the electricity grid, thanks to solar energy. These men continue their efforts in expanding the use of renewable energy to surrounding communities and even on a larger scale to nearby farms. We are eternally grateful to these men and Groupo Fenix for the life skills they have given us. It is now up to us to pass on this vital information to our own communities.


Author: Nicole Lynch

11 April, 2007

Sabana Grande, Nicaragua: Adobe Construction


Hope for the Future
Mujeres Solares de Totogalpa is a fantastic example of a group focused on sustainability and the empowerment of women. Most of the work that is going into the project is based on the hope that the center will be a success and provide jobs for future generations.


Building a Composting Toilet with Adobe
This was our main volunteer project for Mujeres Solares. It is a composting toilet located behind the center and became a priority for the group when they learned that they were losing access to the latrine that they currently use across the street. It is located behind the Center at the back of the property. Pictured here are Kelly Wassell (on left) and Claire Wingerd applying mortar between the layers of adobe. The corner pieces (seen at far right) are placed first to ensure that the layer of adobe is plumb before the rest of the blocks are put on. With our help the group was able to get about a meter of wall completed in one morning!


Original Dream of Solar Women's Center
This is the original plan created by one of the children of the members of Mujeres Solares. The dream and the plans have changed a bit, and even more now that they are actually constructing the buildings. But we thought this one represented the center the best.


'Mujeres Solares' Adobe Construction
In this picture, we are preparing mortar to help build an adobe bathroom for Solares Mujueres. On the left, we are smashing old (cracked) adobe bricks to re-use them. Then, we make a small pile with the adobe dirt and create a crater (hole) in the middle. After that, we mixed it with water. We were able to tell when it became mortar as it turned it a thick muddy substance. Finally, it was ready to glue the adobe bricks together to make a bathroom. It might not look very hard, but it was strenuous labor. We had fun while making it too!


Nearly-finished Solar Women's Center
This picture was taken from the side facing the InterAmerican Highway, in front of the tool shed. The building utilizes a raised foundation of concrete to keep the rain from eating away the adobe, and the group found it difficult to find a legal source for the lumber used to hold up locally-fired tile roof. The pile of material in the foreground is waiting to be used for the stucco finish.


 Author: Nicole Lynch